As I promised, this is my second post of the Cuckoo tutorial set, I’ll be guiding you through the process of making a Windows VM (Sandbox), where Cuckoo will run all the malware you throw in it. This part will also show a first run of the platform.
It is important to state that this step isn’t as easy it seems to be, the hardest part is tuning the VM as much as possible so most of the malware found around the internet won’t be able to identify it as a VM. Malware now a days have various ways to check whether it is being ran on a VM or a real host. This happens because the people who make them put a lot of effort on doing so and they won’t be pleased to know that their malware got reversed engineered and countered.
To start off, as you could have imagined, you are going to need a Windows 7 ISO image to install on your new VM. Check the list below for the specs recommended for it, some specs are also checking points for malwares like HD size and memory available. Remember that this tutorial is based on a Virtual Box environment.
- At least 60 GB HD;
- At least 2 GB RAM Memory;
- At least 2 processor cores;
- Set up the “Pointing Device” as “PS/2 Mouse” (this may cause malfunction with the mouse while operating the VM on the Linux machine through xRDP);
- Set up the processor execution cap at 100%;
- Set up the extended feature “PAE/NX”;
- Set up the hardware virtualization “VT-x/AMD-V” and “Nested Paging”;
- No video acceleration is required;
- Set up the network to “Host-only adapter”.
After setting up the characteristics for the VM, it is time to install your Windows 7 image. It’s optimal to install a fully up to date image, since your sandbox should look like a real machine. After doing the steps above, your VM should look something like this:
Note that my VM has only 40 GB HD, this is something that I came across while creating it and running some tests on it. It is widely advised that you build yours with at least 80 GB HD, since this is something that malware nowadays look after. So, when Windows finishes installing, there’s some steps you’ll need to take to keep up with the setup of your sandbox, here they are:
- Do not install Virtual Box Guest additions. Some malware look for registry entries and they may find those. If you do, my guide will cover you up lately;
- Fully update the system via Windows update;
- Turn off Windows update after the step above;
- Turn off Windows firewall;
- Turn off Windows defender;
- Turn off Security Center;
- Turn off UAC;
- Turn off all the notifications you will get by disabling these services;
- Set the “Adjust for Better Performance” option on System Properties
- Set a fixed IP address, Cuckoo default network is 192.168.56.x, so you can set up yours with something like 192.168.56.7. This address must be placed on the virtualbox.conf file on the Cuckoo conf folder (check this out on part 1);
- Set video resolution to 1024×768;
- Put some garbage on users folders like images and music, also surf the web a bit for browser history.
Now that you’re done tweaking Windows, it’s time to install all the software and tools you will be needing to run the vast majority of malware you will find. You have basically 3 ways to do so:
- First is to setup an ISO image with all the software you need inside it and open it up on the VM;
- Second is to make a network share between your host machine and the VM, then move the files to the VM;
- Third and the least recommended is to install Virtual Box guest additions and transfer all the files;
The third way is the least recommended because, as I already stated above , it leaves traces on the machine that it is a virtual machine. You can still install it and remove all the registry entries that relate to Virtual Box, I’ve done that. So, about the software you need to install, here’s the list:
- Microsoft Office 2013 x86 (32 bits)
- Microsoft .NET Framework 4.6 and 4.6.1
- Microsoft Visual C++ 2005, 2008, 2010, 2012, 2013, 2015
- Adobe Reader v9.0
- Flash Player v11
- Java RE 6 (I’ve installed v6u22)
- Python 2.7
- Pillow 2.9.0
- 7zip
- Cuckoo agent “agent.pyw”
- PaFish – Paranoid Fish (tool used to check whether the VM is well obfuscated or not)
After every installation, be sure to run the software for the first time and accept any terms it may pop up, also leave it maximized and then close it. Cuckoo won’t be able to run every single software that exists, it has compatibility with some software at specific versions. Be sure to check out Cuckoo documentation for details about this.
You can find all this software around the web with a few clicks but I know how boring it would be to get all this stuff. Knowing that, I will soon put a link on this post with all the stuff you need in a single ISO file, stay tuned. x64 versions or most recent versions of some software’s such as Office and Adobe Reader, may not work properly with Cuckoo, you can try them out if you want.
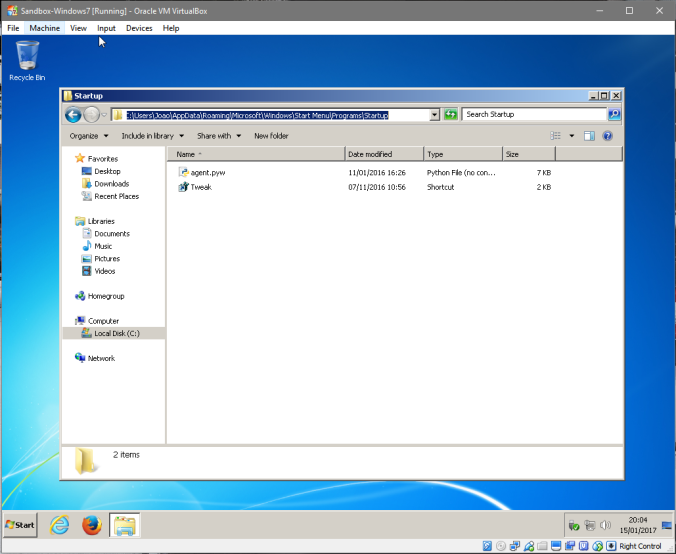
Going forward, there’s still some things you need to do before you can fire Cuckoo up. There’s a piece of software from Cuckoo platform that we need to put on the VM so it starts every time the VM runs, it’s the “agent.pyw”. You can find the file on the Cuckoo dir that you’ve downloaded before. Here are the steps:
- On the Windows VM, navigate to “C:\Users\<username>\AppData\Roaming\Microsoft\Windows\Start Menu\Programs\Startup”;
- Put the agent.pyw file on the folder;
All right, we now need to add a file I made myself which does some changes to Windows every time you start it up. Since Cuckoo will run a snapshot of the live VM, as soon as the VM fires up when analyzing a sample, this script will clear some stuff that may be used by malware for tracking, such as the registry entries from Guest Additions.
- Open up a notepad;
- Type in the following:
Windows Registry Editor Version 5.00

[HKEY_LOCAL_MACHINE\HARDWARE\DESCRIPTION\SYSTEM]
"SystemBiosDate"="06/12/10"
"SystemBiosVersion"="BC1.05"
"VideoBiosVersion"="VC1.20"

[-HKEY_LOCAL_MACHINE\HARDWARE\ACPI\DSDT\VBOX__]
[-HKEY_LOCAL_MACHINE\HARDWARE\ACPI\FADT\VBOX__]
[-HKEY_LOCAL_MACHINE\HARDWARE\ACPI\RSDT\VBOX__]
[-HKEY_LOCAL_MACHINE\SOFTWARE\Oracle\Virtual Box Guest Additions]
[-HKEY_LOCAL_MACHINE\SYSTEM\ControlSet001\Services\VBox*]
[-HKEY_LOCAL_MACHINE\SYSTEM\ControlSet001\Control\CriticalDeviceDatabase\pci#ven_80ee&dev_cafe]
[-HKEY_LOCAL_MACHINE\SYSTEM\ControlSet001\Control\Class\{4D36E97D-E325-11CE-BFC1-08002BE10318}\0020]
[-HKEY_LOCAL_MACHINE\SYSTEM\ControlSet001\Enum\PCI\VEN_80EE&DEV_CAFE&SUBSYS_00000000&REV_00]
[-HKEY_LOCAL_MACHINE\SYSTEM\ControlSet001\services\VBoxGuest\Enum]
[-HKEY_LOCAL_MACHINE\SYSTEM\ControlSet002\Enum\PCI\VEN_80EE&DEV_CAFE&SUBSYS_00000000&REV_00]
[-HKEY_LOCAL_MACHINE\SYSTEM\ControlSet002\Control\Class\{4D36E97D-E325-11CE-BFC1-08002BE10318}\0020]
[-HKEY_LOCAL_MACHINE\SYSTEM\ControlSet002\Control\CriticalDeviceDatabase\pci#ven_80ee&dev_cafe]
[-HKEY_LOCAL_MACHINE\SYSTEM\ControlSet002\Enum\PCI\VEN_80EE&DEV_CAFE&SUBSYS_00000000&REV_00]
[-HKEY_LOCAL_MACHINE\SYSTEM\CurrentControlSet\Control\Class\{4D36E97D-E325-11CE-BFC1-08002BE10318}\0020]
[-HKEY_LOCAL_MACHINE\SYSTEM\CurrentControlSet\Control\CriticalDeviceDatabase\pci#ven_80ee&dev_cafe]
[-HKEY_LOCAL_MACHINE\SYSTEM\CurrentControlSet\Enum\PCI\VEN_80EE&DEV_CAFE&SUBSYS_00000000&REV_00]
[-HKEY_LOCAL_MACHINE\SYSTEM\CurrentControlSet\services\VBoxGuest\Enum]
- Save the file as any name you want with the extension “.reg”
- Put it or create a shortcut to it in the startup folder “C:\Users\<username>\AppData\Roaming\Microsoft\Windows\Start Menu\Programs\Startup”
This file will erase a few registry lines and rewrite some Bios data about the machine.
The next step is to delete a device that is installed by the Virtual Box, it gets there every time the machine starts up. I couldn’t find any other way to prevent it from being installed or removing it with a script. If you find out any way to do that in a more automated way, please let me know!
It’s almost over now, run the “pafish” tool to check how well obfuscated your VM is. I couldn’t make mine perfect, from all the research I’ve done, many have stumbled with the same stuff I have and I didn’t found out how to fix it. Anyway, here’s how it should look like.
As you can see I got traced on a few things, this means that my sandbox setup isn’t as good as it could be.
For the final steps, you’ll be going to need to do the following:
- Export the VM to an “.ova” file (if you were using Virtual Box outside of the Cuckoo linux host) and move it to the Linux host;
- Import the machine on the Virtual Box of the Linux host:
- Log in the Linux host with xRDP
- Run the console and type “sudo virtualbox”
- Import the appliance
- Close Virtualbox and type the following on console:
- sudo vboxmanage list vms (check VM name)
- sudo vboxmanage controlvm “Sandbox-Windows7” poweroff (make sure it’s off)
- sudo vboxmanage startvm “Sandbox-Windows7”
- Wait the machine to start and uninstall manually the device showed above, then close every window and leave the desktop clear
- Go back to the console on the Linux host and type “sudo vboxmanage snapshot “Sandbox-Windows7” take “baseline” –pause”
- sudo vboxmanage controlvm “Sandbox-Windows7” poweroff
- sudo vboxmanage snapshot “Sandbox-Windows7” restorecurrent
Ok, from now on Virtualbox is ready to receive the samples from Cuckoo and the virtual machine will turn on right where we left it when a job is sent. You should double check the conf files of Cuckoo to make sure that all settings match with the VM, for example, the IP address you’ve set on the VM must be the same at virtualbox.conf file, as well the VM name.
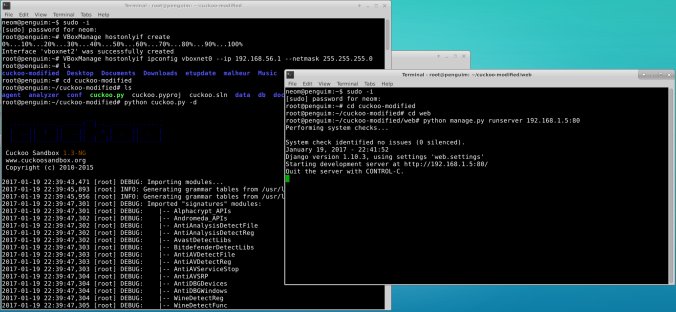
Now it’s time to run a few commands and try out Cuckoo, do the following and start testing!
- Start Virtualbox network interface (you will have to do this every time the Linux host boots)
- VBoxManage hostonlyif create
- VBoxManage hostonlyif ipconfig vboxnet0 –ip 192.168.56.1 –netmask 255.255.255.0 (if you didn’t changed the default IP address, it will be the same)
- Open two console windows on the Linux host
- Run sudo -i to make sure you got root privileges on both
- Navigate to the main Cuckoo folder and type this:
- python cuckoo.py -d
- On the other console, also navigate to Cuckoo main folder and then on the web folder and type this:
- python manage.py runserver 192.168.X.X:80 (where X is the IP address of the Linux host)
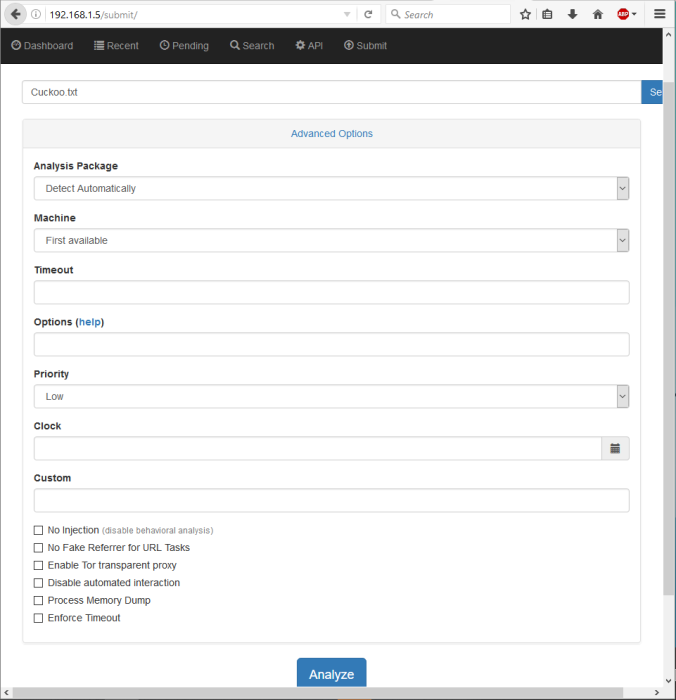
Now you can go to your browser and type in the IP address from your Linux host, if everything went fine, you should see this:
Try out Cuckko sending your first sample. You can also check out the VM working alone.
And that’s it!
It’s all good to go and you can start testing. Check out the results on any analysis you make on the web interface. You can open up the xRDP on Linux to see Cuckoo working or to troubleshoot any problems you face.
I hope I’ve had covered everything in these two parts, if you got any trouble, ideas or suggestions, please comment below or just leave your feedback. I’ll be around and improve anything that may need an extra touch.


The version of Windows 7 in this example is the x64, right? You are not doing nested VMs, right? I have done the next VMs with x32 inside the x64 cuckoo host.
LikeLike
Glad to hear from you again! Answering your question, it is x32. That’s because most of the plugins in the Cuckoo modulo will only work properly on 32 bit systems. This is a single VM on a physical x64 Linux host.
LikeLike
Maybe a fourth option to moving software – python comes with a Simple HTTP server. You could just type the command ‘python -m SimpleHTTPServer’ …. then point your browser inside your guest and download anything you need. When you escape the HTTP server is destroyed. 🙂
LikeLike
Thanks for your point mate, feel free for any additional feedbacks!
LikeLike
Hi,
your guide was extremely helpful and I really appreciate it. Well done!
Warm regards
LikeLiked by 1 person
I’m really glad to hear that!
LikeLike
i upgraded using cuckoo sudo pip install cuckoo , i run ./cuckoo.py i found these error please can you help me
codka@ubuntu:~/Downloads/cuckoo$ ./cuckoo.py
Traceback (most recent call last):
File “./cuckoo.py”, line 20, in
from lib.cuckoo.core.scheduler import Scheduler
File “/home/codka/Downloads/cuckoo/lib/cuckoo/core/scheduler.py”, line 21, in
from lib.cuckoo.core.guest import GuestManager
File “/home/codka/Downloads/cuckoo/lib/cuckoo/core/guest.py”, line 13, in
import requests
File “/usr/local/lib/python2.7/dist-packages/requests/init.py”, line 52, in
from .packages.urllib3.contrib import pyopenssl
File “/usr/local/lib/python2.7/dist-packages/requests/packages/urllib3/contrib/pyopenssl.py”, line 46, in
import OpenSSL.SSL
File “/usr/local/lib/python2.7/dist-packages/OpenSSL/init.py”, line 8, in
from OpenSSL import rand, crypto, SSL
File “/usr/local/lib/python2.7/dist-packages/OpenSSL/SSL.py”, line 118, in
SSL_ST_INIT = _lib.SSL_ST_INIT
AttributeError: ‘module’ object has no attribute ‘SSL_ST_INIT’
LikeLiked by 1 person
Sorry for the delay, last days were busy.
Tricky question, normally when I was messing with Cuckoo, whenever i tried to update something or even Cuckoo itself, it most of the time crashed…. Unfortunately the platform have many different components and updating bits of it is a risk.
I did not tried yet to update my setup to the last version so i think I won`t be able to assist you on this, sorry.
LikeLike
Hi,
I noticed you used Ubuntu server here, had you tried using KALI linux in setting up Cuckoo?
LikeLike
Hey,
Never tried, I actually used Ubuntu because its the recommendation for their website. I do think it might work just fine but the point is having the cleanest system possible so the host which is handling the platform have as many free resources as possible.
LikeLike