Building your Secure Development Life Cycle (SDLC) strategy

SDLC or S-SDLC (Secure Software Development Life Cycle) is a methodology that aims to improve the overall security of web and regular application development processes. The main idea is to understand your current, or to-be, development process and include your business`s minimal security requirements on it. Considering development good practices, standards and guides on the different phases of the whole development process, might be an ambitious and challenging project that would require money, man-hours and cultural changes as well.

There are many proprietary and open-source methodologies each one with their specific characteristics and requirements but in the end, the goal is eventually the same, improve the overall security of your development process. While you can discuss and evaluate the development process of your company, the best approach I would recommend is to adapt security to the current process, instead of changing the current process so it become compliant to your security requirements. Doing it this way, would minimize the cultural shock and effort needed to deploy such requirements and it would less “friction” and resistance to your company.

I’d define this initiative in two different projects, based on the reality you’re facing:

  • Implementing a SDLC into your company’s development team, if there are any
  • Defining your company’s requirements to buy/hire development services

For this post, I’ll be discussing the first point as the SDLC would fit better for this reality.

The first step is to understand how your development process works, what are the main phases, which are the artifacts, documentations, standards and activities that the development team does/has. Generally speaking, your development processes would, at a certain point, fit into one of the most used methodologies like Waterfall, DevOps, Agile, etc. but, as I stated on the start of this post, the idea isn’t to change the development process but is to implement a minimum security standard to it. An overall secure development process can, at a high level, be defined on the following steps:

  • Training/Awareness
    • Professionals are presented to the methodology and complimentary security training is provided
  • Requirements
    • Security requirements are defined and formalized in an overall manner so it applies to all development projects, based on the business risk appetite
  • Design
    • Threat modeling and early definitions of how the coding work should be carried on
  • Code
    • Coding is done in a secure way, using secure and up-to-date libraries and languages, static code analysis may also be done
  • Testing
    • Pen-tests, static and dynamic analysis are executed on this phase, the project must achieve a result aligned to the defined risk appetite
  • Release/Sustain
    • Vulnerability management, recurrent testing and incident management are the activities done in this phase. This needs to occur until the solution is decommissioned.

At each step, security requirements should be added, for instance when doing the regular development training for employees, secure development practices should also be included in this training, teaching developers the good security practices and bringing awareness to the topic. Having security addressed at each one of the main development phases, will reduce the amount of re-work and most importantly risks at the end of the development project. Leaving the security checks for the end of the project will, almost certainly, impact business`s deadlines due to vulnerabilities or security risks needing to be fixed on production or pre-production environments. That’s why it isn’t enough to just do dynamic analysis or pen-tests as the last check before going to production.

Unfortunately, as many other things in life, there’s no silver bullet that would perfectly fit your reality, the whole SDLC methodology is, more than anything else, an awareness and training initiative. A detailed and deep study of your current reality needs to be done, at the same time that your risk appetite defined and because of that, each SDLC project may differ from the other.

Let me know what you think of this topic, feedback is always welcome and check out some references and sources below.

IoT – Wolf in sheep’s clothing

The world of IoT (internet of things) devices is certainly a magnificent one, the idea of having everything connected with remote access possibilities such as televisions, telephones, cameras, personal assistants, electronic controllers (light and temperature) attracts the attention of everyone, from regular people that aren’t much of tech savvy to the technology enthusiasts.

At the same time IoTs brings comfort, agility and most importantly, clients to your business or even assists your business to perform better, it also may bring serious security risks to your network and company. You probably heard about SDLC, Secure Development Life Cycle and many other processes that aims to reduce security risks, since the early stages of a development process, this is exactly what`s generally missing when we talk IoT.

Many IoT companies that either builds their own devices from scratch or just create slightly modified clones, aren’t very interested in their security side of development, devices are manufactured aiming only the user experience or maybe just its functional purpose, without taking in account the security that encompasses its own functionality. One strong example of IoT devices that suffered with its lack of security is Stuxtnet, a piece of malware that attack SCADA systems (basically factory machinery controllers) and was renowned for the damage it caused to Iran`s nuclear power program.

As you may be thinking now, industrial IoT devices pose a greater security risks when we look at the industrialized side of it due it`s life threatening consequences but let’s not forget your smart TV or your personal assistant monitoring your conversations show it can present you “relevant” ADs.

I brought all these points to raise awareness about the IoT subject, being your home or your company network, IoT security and its life cycle should be part of any ISMS (Information Security Management System) or, at least, one of your main concerns. Besides cost and benefit, there must be processes in place to control, monitor and most importantly, update these devices. A regular vulnerability management program may address the IoT matter by including these devices into its controls but, as a personal opinion and also based on my experience, IoTs should have a dedicated attention due its nature and evolving volume.

My recommendation, as in a general way to manage IoTs, are separate key actions, by achieving any of them, you`ll slowly increase your maturity handling the IoT security risk. These steps may be defined as follows:

  • Discovery
    • Network scans are key for this step, discovering everything that is connected to your network is important so you`ll be able to evaluate the effort and investment needed to the whole project.
    • You may also tag these devices, by defining vlans, using asset database such as a CMDB or even acquiring and vulnerability management platform such as Nexpose, Nessus, Qualys, etc.
  • Inventory
    • Build and maintain an inventory of such devices with information like technical and business owners, so the right people can be accountable correctly whenever some action towards an IoT needs to be taken, such as updating its firmware
  • Control
    • A management and evaluation process must be defined for acquisition or development of new devices, this must ensure that new devices aren’t being added to the network without the proper control
    • IoTs that will be bought from vendors need to be evaluated according to its security maturity and the wanted levels defined by the organization, avoiding vulnerable or insecure devices to be added to the network
    • Development to take in account both hardware and software, this is a complex topic but in a general way, these newly developed devices must be aligned with the desired security level
  • Life Cycle
    • Define the management process for all IoT on the network by agreeing on regular vulnerability scans, updates and patches published by vendors and when to apply such updates or decommission a device
    • Define hardening profiles to all possible devices, just as workstations, network devices and servers have their own hardening profile, capable IoT devices need to be hardened. Changing its default password, open ports, disabling unnecessary services is something to start with

These steps are definitely not extensible and may miss a thing or another, but my goal on this post is to open the topic for discussion and bring up awareness to this security risk that you may not have seen yet in your “house”. As always, for a successful security program in your company, it is key to be aligned with your business goals and have their support, otherwise any security initiative my face a lot of resistance.

Feel free to reach me out or post your comments about this, I’ll be more than happy to discuss with the security community.


Installing and running Cuckoo malware analysis platform – Part 2

As I promised, this is my second post of the Cuckoo tutorial set, I’ll be guiding you through the process of making a Windows VM (Sandbox), where Cuckoo will run all the malware you throw in it. This part will also show a first run of the platform.

It is important to state that this step isn’t as easy it seems to be, the hardest part is tuning the VM as much as possible so most of the malware found around the internet won’t be able to identify it as a VM. Malware now a days have various ways to check whether it is being ran on a VM or a real host. This happens because the people who make them put a lot of effort on doing so and they won’t be pleased to know that their malware got reversed engineered and countered.

To start off, as you could have imagined, you are going to need a Windows 7 ISO image to install on your new VM. Check the list below for the specs recommended for it, some specs are also checking points for malwares like HD size and memory available. Remember that this tutorial is based on a Virtual Box environment.

  • At least 60 GB HD;
  • At least 2 GB RAM Memory;
  • At least 2 processor cores;
  • Set up the “Pointing Device” as “PS/2 Mouse” (this may cause malfunction with the mouse while operating the VM on the Linux machine through xRDP);
  • Set up the processor execution cap at 100%;
  • Set up the extended feature “PAE/NX”;
  • Set up the hardware virtualization “VT-x/AMD-V” and “Nested Paging”;
  • No video acceleration is required;
  • Set up the network to “Host-only adapter”.

After setting up the characteristics for the VM, it is time to install your Windows 7 image. It’s optimal to install a fully up to date image, since your sandbox should look like a real machine. After doing the steps above, your VM should look something like this:

capture6

Note that my VM has only 40 GB HD, this is something that I came across while creating it and running some tests on it. It is widely advised that you build yours with at least 80 GB HD, since this is something that malware nowadays look after. So, when Windows finishes installing, there’s some steps you’ll need to take to keep up with the setup of your sandbox, here they are:

  • Do not install Virtual Box Guest additions. Some malware look for registry entries and they may find those. If you do, my guide will cover you up lately;
  • Fully update the system via Windows update;
  • Turn off Windows update after the step above;
  • Turn off Windows firewall;
  • Turn off Windows defender;
  • Turn off Security Center;
  • Turn off UAC;
  • Turn off all the notifications you will get by disabling these services;
  • Set the “Adjust for Better Performance” option on System Properties
  • Set a fixed IP address, Cuckoo default network is 192.168.56.x, so you can set up yours with something like 192.168.56.7. This address must be placed on the virtualbox.conf file on the Cuckoo conf folder (check this out on part 1);
  • Set video resolution to 1024×768;
  • Put some garbage on users folders like images and music, also surf the web a bit for browser history.

Now that you’re done tweaking Windows, it’s time to install all the software and tools you will be needing to run the vast majority of malware you will find. You have basically 3 ways to do so:

  • First is to setup an ISO image with all the software you need inside it and open it up on the VM;
  • Second is to make a network share between your host machine and the VM, then move the files to the VM;
  • Third and the least recommended is to install Virtual Box guest additions and transfer all the files;

The third way is the least recommended because, as I already stated above , it leaves traces on the machine that it is a virtual machine. You can still install it and remove all the registry entries that relate to Virtual Box, I’ve done that. So, about the software you need to install, here’s the list:

  • Microsoft Office 2013 x86 (32 bits)
  • Microsoft .NET Framework 4.6 and 4.6.1
  • Microsoft Visual C++ 2005, 2008, 2010, 2012, 2013, 2015
  • Adobe Reader v9.0
  • Flash Player v11
  • Java RE 6 (I’ve installed v6u22)
  • Python 2.7
  • Pillow 2.9.0
  • 7zip
  • Cuckoo agent “agent.pyw”
  • PaFish – Paranoid Fish (tool used to check whether the VM is well obfuscated or not)

After every installation, be sure to run the software for the first time and accept any terms it may pop up, also leave it maximized and then close it. Cuckoo won’t be able to run every single software that exists, it has compatibility with some software at specific versions. Be sure to check out Cuckoo documentation for details about this.

You can find all this software around the web with a few clicks but I know how boring it would be to get all this stuff. Knowing that, I will soon put a link on this post with all the stuff you need in a single ISO file, stay tuned. x64 versions or most recent versions of some software’s such as Office and Adobe Reader, may not work properly with Cuckoo, you can try them out if you want.

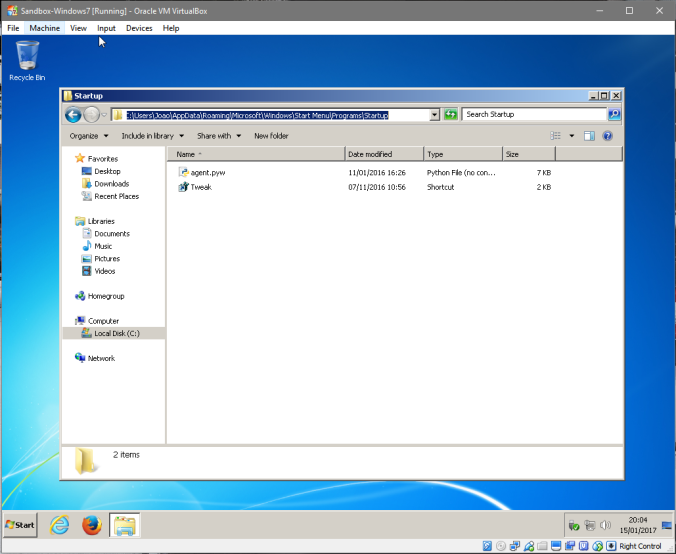
Going forward, there’s still some things you need to do before you can fire Cuckoo up. There’s a piece of software from Cuckoo platform that we need to put on the VM so it starts every time the VM runs, it’s the “agent.pyw”. You can find the file on the Cuckoo dir that you’ve downloaded before. Here are the steps:

  • On the Windows VM, navigate to “C:\Users\<username>\AppData\Roaming\Microsoft\Windows\Start Menu\Programs\Startup”;
  • Put the agent.pyw file on the folder;

All right, we now need to add a file I made myself which does some changes to Windows every time you start it up. Since Cuckoo will run a snapshot of the live VM, as soon as the VM fires up when analyzing a sample, this script will clear some stuff that may be used by malware for tracking, such as the registry entries from Guest Additions.

  • Open up a notepad;
  • Type in the following:
Windows Registry Editor Version 5.00

[HKEY_LOCAL_MACHINE\HARDWARE\DESCRIPTION\SYSTEM]
"SystemBiosDate"="06/12/10"
"SystemBiosVersion"="BC1.05"
"VideoBiosVersion"="VC1.20"

[-HKEY_LOCAL_MACHINE\HARDWARE\ACPI\DSDT\VBOX__]
[-HKEY_LOCAL_MACHINE\HARDWARE\ACPI\FADT\VBOX__]
[-HKEY_LOCAL_MACHINE\HARDWARE\ACPI\RSDT\VBOX__]
[-HKEY_LOCAL_MACHINE\SOFTWARE\Oracle\Virtual Box Guest Additions]
[-HKEY_LOCAL_MACHINE\SYSTEM\ControlSet001\Services\VBox*]
[-HKEY_LOCAL_MACHINE\SYSTEM\ControlSet001\Control\CriticalDeviceDatabase\pci#ven_80ee&dev_cafe]
[-HKEY_LOCAL_MACHINE\SYSTEM\ControlSet001\Control\Class\{4D36E97D-E325-11CE-BFC1-08002BE10318}\0020]
[-HKEY_LOCAL_MACHINE\SYSTEM\ControlSet001\Enum\PCI\VEN_80EE&DEV_CAFE&SUBSYS_00000000&REV_00]
[-HKEY_LOCAL_MACHINE\SYSTEM\ControlSet001\services\VBoxGuest\Enum]
[-HKEY_LOCAL_MACHINE\SYSTEM\ControlSet002\Enum\PCI\VEN_80EE&DEV_CAFE&SUBSYS_00000000&REV_00]
[-HKEY_LOCAL_MACHINE\SYSTEM\ControlSet002\Control\Class\{4D36E97D-E325-11CE-BFC1-08002BE10318}\0020]
[-HKEY_LOCAL_MACHINE\SYSTEM\ControlSet002\Control\CriticalDeviceDatabase\pci#ven_80ee&dev_cafe]
[-HKEY_LOCAL_MACHINE\SYSTEM\ControlSet002\Enum\PCI\VEN_80EE&DEV_CAFE&SUBSYS_00000000&REV_00]
[-HKEY_LOCAL_MACHINE\SYSTEM\CurrentControlSet\Control\Class\{4D36E97D-E325-11CE-BFC1-08002BE10318}\0020]
[-HKEY_LOCAL_MACHINE\SYSTEM\CurrentControlSet\Control\CriticalDeviceDatabase\pci#ven_80ee&dev_cafe]
[-HKEY_LOCAL_MACHINE\SYSTEM\CurrentControlSet\Enum\PCI\VEN_80EE&DEV_CAFE&SUBSYS_00000000&REV_00]
[-HKEY_LOCAL_MACHINE\SYSTEM\CurrentControlSet\services\VBoxGuest\Enum]
  • Save the file as any name you want with the extension “.reg”
  • Put it or create a shortcut to it in the startup folder “C:\Users\<username>\AppData\Roaming\Microsoft\Windows\Start Menu\Programs\Startup”

capture2

This file will erase a few registry lines and rewrite some Bios data about the machine.

capture3

The next step is to delete a device that is installed by the Virtual Box, it gets there every time the machine starts up. I couldn’t find any other way to prevent it from being installed or removing it with a script. If you find out any way to do that in a more automated way, please let me know!

capture1

It’s almost over now, run the “pafish” tool to check how well obfuscated your VM is. I couldn’t make mine perfect, from all the research I’ve done, many have stumbled with the same stuff I have and I didn’t found out how to fix it. Anyway, here’s how it should look like.

capture4

capture5

As you can see I got traced on a few things, this means that my sandbox setup isn’t as good as it could be.

For the final steps, you’ll be going to need to do the following:

  • Export the VM to an “.ova” file (if you were using Virtual Box outside of the Cuckoo linux host) and move it to the Linux host;
  • Import the machine on the Virtual Box of the Linux host:
    • Log in the Linux host with xRDP
    • Run the console and type “sudo virtualbox”
    • Import the appliance
  • Close Virtualbox and type the following on console:
    • sudo vboxmanage list vms (check VM name)
    • sudo vboxmanage controlvm “Sandbox-Windows7” poweroff (make sure it’s off)
    • sudo vboxmanage startvm “Sandbox-Windows7”
    • Wait the machine to start and uninstall manually the device showed above, then close every window and leave the desktop clear
    • Go back to the console on the Linux host and type “sudo vboxmanage snapshot “Sandbox-Windows7” take “baseline” –pause”
    • sudo vboxmanage controlvm “Sandbox-Windows7” poweroff
    • sudo vboxmanage snapshot “Sandbox-Windows7” restorecurrent

Ok, from now on Virtualbox is ready to receive the samples from Cuckoo and the virtual machine will turn on right where we left it when a job is sent. You should double check the conf files of Cuckoo to make sure that all settings match with the VM, for example, the IP address you’ve set on the VM must be the same at virtualbox.conf file, as well the VM name.

Now it’s time to run a few commands and try out Cuckoo, do the following and start testing!

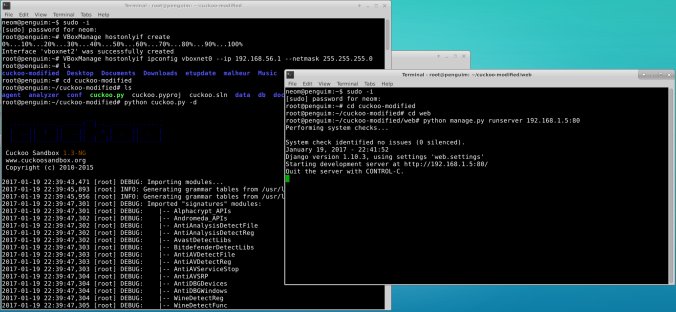
  • Start Virtualbox network interface (you will have to do this every time the Linux host boots)
    • VBoxManage hostonlyif create
    • VBoxManage hostonlyif ipconfig vboxnet0 –ip 192.168.56.1 –netmask 255.255.255.0 (if you didn’t changed the default IP address, it will be the same)
  • Open two console windows on the Linux host
  • Run sudo -i to make sure you got root privileges on both
  • Navigate to the main Cuckoo folder and type this:
    • python cuckoo.py -d
  • On the other console, also navigate to Cuckoo main folder and then on the web folder and type this:
    • python manage.py runserver 192.168.X.X:80 (where X is the IP address of the Linux host)

capture9

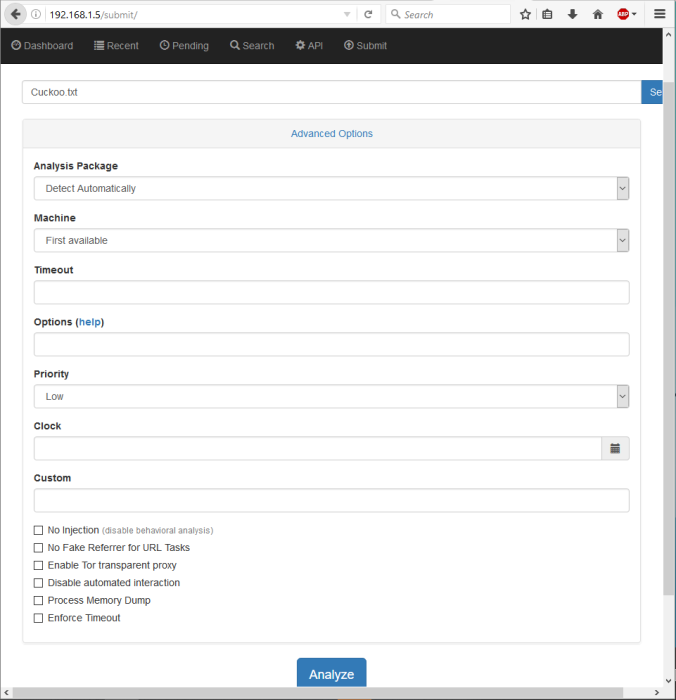
Now you can go to your browser and type in the IP address from your Linux host, if everything went fine, you should see this:

capture10

Try out Cuckko sending your first sample. You can also check out the VM working alone.

capture11

capture12

And that’s it!

It’s all good to go and you can start testing. Check out the results on any analysis you make on the web interface. You can open up the xRDP on Linux to see Cuckoo working or to troubleshoot any problems you face.

I hope I’ve had covered everything in these two parts, if you got any trouble, ideas or suggestions, please comment below or just leave your feedback. I’ll be around and improve anything that may need an extra touch.

Pentesting Script – Guidelines

In this post I’ll be covering mostly the basics of any pentest assessment, which is basically a generic checklist of what to test and the tools you should be using. Obviously, as my recommendation, they sure aren’t the only way to do things, this is a compilation of best practices and experiences that I’ve gathered over my years working as a security analyst. The best way will always be the way you get along with mixed with the one that suit your needs.

To start off, this post covers 5 major phases that I generally run on every pentest assessment, this list doesn’t need to be run extensively in every test, since each assessment has its own particularities. This works great as a guide during a test, by looking at the phases and its tasks as testing recommendations, and as you may think, I’m not listing every single step and tasks since my testing script is very extensive. Start off, as for the first phase:

  • Phase 1 – Automated Testing

This phase is responsible for the hard and extensive work during an assessment. Automated scanning tools should be used first, as they can setup the initial path you should take for more detailed testing and save precious time. These tools can be slipt mostly in two categories, the first one that focus in web application testing and the second for infrastructure testing. As for the tasks in this phase, here’s the most important:

  • Run infrastructure automated scan. (Nmap, Nexpose, Nessus);
  • Run application automated scan. (Acunetix, Burp Suite, ZED);
  • Run Nmap or similar tool to scan all TCP ports;
  • If any vulnerabilities be identified, verify whether public exploits exist (Metasploit, Exploit-DB.com.

Acunetix, Nexpose and Nessus are excellent paid commercial tools but they all can be replaced by manual testing, open source tools and a lot of patience if you can’t afford paying for these licenses.

  • Phase 2 – Manual Testing – Information Gathering

In this phase, if it applies, we will be looking for relevant public information about the target of the assessment, such as e-mails addresses that may be used on the application, manuals and any sensitive information indexed by the major search providers (Google and Shodan for example). Any information found on this phase may help the further testing at some point and mostly, at the manual testing. The tasks of this phase are:

  • Provoke application errors and analyze responses for possible information leakage;
  • Identify potentially dangerous functionalities such as file uploads;
  • Attempt to identify possible hidden features of the application (e.g. Hidden debug / admin parameters or links);
  • Verify whether error pages can be influenced by user input parameters.

Any information that may seem useless at first should be stored for later analysis. I had countless assessments that I got myself using something that at first I thought I you’d never use.

  • Phase 3 – Manual Testing – Authentication Testing

This phase main objective is to test how the application works with authentication. Whether by using manual credentials input, SSO (Single Sign On) feature or none at all, we will focus our efforts in finding vulnerabilities regarding the authentication process.

  • Verify whether HTTPS is used to encrypt credentials and / or sensitive data;
  • Test for user enumeration vulnerabilities;
  • Test for bypassing authentication by forced browsing;
  • Test for bypassing authentication by SQL Injection on the login page;
  • Test if password reset/reminder can be guessed or bypassed;
  • If possible, verify that all users have a unique user id;

The idea is trying to bypass the regular authentication of the application, accessing it without any authentication at all or even by using a profile you don’t have access.

  • Phase 4 – Manual Testing – Session Management Testing

Session management is how the application handles user sessions by the time you get first authenticated, for example, after you provide the login credentials. The main idea in this phase is to check whether the application can maintain good track of your privileges as an authorized user and which actions you can take “inside” of the application. Tasks in this phase can be summarized as:

  • Verify session timeout enforced in a reasonable amount of time;
  • Check for session fixation (not invalidating/re-issuing current session token after authenticating or forcing a known session ID on a user);
  • If the site is secure (HTTPS), check if the session ID passed over an unencrypted connection at any stage (HTTP);
  • Check is the session ID is sent in a GET request at any stage. Verify if it is possible to force it into the GET request;
  • Verify that all pages that require authentication also contain a clear Logout button;
  • Check for weak obfuscation or encryption of cookie data;
  • Test if concurrent logins are possible.

Common exploits regarding session management are privileges elevation, user personification and session theft, these can be done by manipulating sessions cookies and by modifying users ID’s.

  • Phase 5 – Manual Testing – Data Validation & Business Logic Testing

This final phase aims for tests of vulnerabilities that your automated tool of choice may already had pointed out, such as SQL Injection, XSS (cross-site scripting), HTML injection and many others. If none of these were pointed out, manual testing should take place in areas where the current type of vulnerability you are testing normally appear, places like forms, fields and any place that data can be inputted by the user. This phase is also the time for specific business logic testing, functionality that are critical to the business.

  • Attempt to subvert critical business logic. (Change transfes limits, access data from client a with client B, change users preferences, etc.);
  • All suspicious parameters (POST & GET parameters, SOAP Headers, etc) manually tested for (Blind) SQL Injection;
  • Generic user input validation testing;
  • Command injection;
  • All suspicious parameters (POST & GET parameters, SOAP Headers, etc) manually tested for Cross-Site Scripting.

Remember that the best way to do any pentesting is by following good practices and most importantly doing what works for you, focus on your best field like programming, thinking out of the box or if everything else fails, reading a lot from Google. Check out OWASP Testing Guide that I’ve posted on my previous post, it should serve you just right to start off.

Vulnerability Management pt.2 – Detecting Vulnerabilities

This is the second part of my previous post (https://secvision22.wordpress.com/2016/05/08/vulnerability_management_pt-_1_-_a_custom_approach/). In this post I’ll be talking about the process of detecting vulnerabilities in applications and infrastructure.

When doing a vulnerability assessment, I usually split it in two sections, application findings and  infrastructure findings. The reason is that they’re two different things, and in a enterprise wide environment you will certainly have different teams taking care of these resources. It is very important to address the issues to the right people if you are interested in a functional vulnerability management process.

Keep in mind that automation of this detection process is very important, taking care of large environments is an arduous task and using tools in your favor is key, even if by doing so you may lower the detailing of what you find. Summarizing the tasks of this step, we can list the main objectives as:

  • Setting-up automated tool-assisted scans. Infrastructure and application;

Tools like Nessus, Acunetix, NMAP and many other must be used in order to automate as much as possible the vulnerability assessment.

  • Scheduling manual testing to critical business related environments;

Systems that are critical to the business or the ones that are sensible to scanning tools must be treated in a different way. Whether it is important to do some deep testing or not bringing  them down, you must list and be aware of them.

  • Maintaining a up-to-date security newsletter base;

Subscribe to vendors and security newsletters to be in touch of the new critical patches or that nasty zero-day vulnerabilities. CVE offers a free newsletter subscription right here: “https://cve.mitre.org/news/newsletter.html&#8221;

  • Safely exploit critical vulnerabilities to find out it’s full potential.

Manually test any critical or potentially critical vulnerability to find out it’s full potential. Some system’s vulnerabilities may lead to access to the company’s network and other systems, it’s a pay for one get two type of problem.

As for the tools, you will find a lot of stuff in this area, the ones that are free will mostly do only specific things and you may run into trouble trying to fulfill the gaps, as you will find yourself running multiple tools to achieve one goal. Of course there are a few paid professional tools that will do the job just fine as well manage all the results you’ll get in one console.

With your favorites tools in hand, automated scans and the results coming in, you may find yourself in a sea of documentations an vulnerabilities. At this point you’ll realize that you probably won’t be able to handle all the reports and most importantly relate all the information. But fear not, this problems should be addressed in another section of the vulnerability management, at the GV3 Manage Vulnerabilities. Software like Nessus, Nexpose and Acunetix are mostly the first pick if you are looking into automated scan tools, these are top commercial tools used worldwide and personally speaking, the best around.

Besides having the tools it’s important to define which is important to you to look after. For example, if it is important to your organization that little to none information about it’s infrastructure is published, your analysis should focus on the footprint step of the vulnerability assessment. I strongly recommend reading OWASP’s Testing Guide, this is an huge document that addresses all the steps you should take and what you should be looking for, it can be found at:

This is one of the most complete and extensive guides that I could ever find, it will surely provide you all the directives you’ll need to start testing.

After setting your testing script, scheduling the automated testing and mapping the systems you must give an special attention, you are all ready to move forward and map the vulnerable systems. Relating all the data you get and prioritizing the systems that the responsible teams should focus their efforts in fixing, is whole different subject and is the main derivable of the vulnerability management process but this is material for a new post.

To conclude this post I would like to point that tools may seen very important to a successful vulnerability management process but in reality, the most important thing a process like this should deliver is to specify the vulnerabilities that all the effort must be focused on, based on it’s risk and the company goals.

Vulnerability Management pt.1 – A custom approach

Companies now a days must face an “always-growing” risk named cyber crime. By the very first time that a company publishes it’s systems or resources on the internet, for the world to see, it starts to risk itself with threats like cyber-crime, hacktivism or just people pure malicious will. Vulnerability management should allow an organization to understand, in a continuous form, the risks associated to the vulnerabilities contained in it’s assets. The goal is to identify and mitigate vulnerabilities related to it’s IT systems so a organization can prevent attackers from causing damage.

For this post I’ll be writing about a relatively new subject, at least for me and most of the companies in Brazil and maybe also in south America. As most of people know, or should know, the methodologies or good market  practices around doesn’t work as a silver bullet, these methodologies are very useful as guidelines for something that you (or your consultant company) may use for drawing a customized and efficient process that fits your needs.

Based on my experience, study and security consultant/analyst years, I started drawing and developing a Vulnerability Management cycle, by reading from many published good management practices, including sources like NIST and SANS. This work was also my essay, presented as my graduation work, which was accepted and approved as my conclusion thesis.

To start off, I’ll be quoting some basics about vulnerability management as told by SANS in one of it’s publications. A vulnerability management process typically has the following steps or fields:

  • Asset Inventory
  • Information Management
  • Risk Assessment
  • Vulnerability Assessment
  • Reporting and Remediation Tracking
  • Response Planning

Each field has it’s unique challenges and good practices, which aren’t my objective here for this post but if you are interested I definitely recommend reading “Vulnerability Management: Tools, Challenges and Best Practices” by SANS. These fields are the baseline for a successful vulnerability management process and therefore must be accomplished.

To illustrate the process itself, SANS uses the following image:

Capture

Moving to the main objective of this post, I’ll be presenting one of the fields which I stressed the most during this project and the complete overview of the custom vulnerability management approach proposed. Before I move forward, here’s a little background from my current company and the environment that I have to deal with:

“We are a multi-business, multi-national enterprise, a holding, of 5 different companies from energy (gas and petrol) to retail and logistics, with 10.000+ employees. Me and my team are responsible for the information security processes and risk analysis for all 5 business.”

By that I think I could say that our network environment are pretty big and complex, something that can totally justify the need of implementing such process.

My goal was to develop a flux of processes which could be executed repeatedly and would feedback itself, something like the PDCA model and many others that aims for the continuous improvement. The following cycle was developed based on the good practices mentioned above and with my real world experience, also looking for the company needs and ours GRC’s (Governance, Risk and Compliance) objectives.

GV0-Fluxo Macro-v1.0-EN

This cycle is the main overview for the vulnerability management process, it is divided in 3 big basic processes as you have seen above:

  • GV1 Detect Vulnerabilities;
  • GV2 Report;
  • GV3 Manage Vulnerabilities.

Each one of these processes has it’s unique set of activities and tasks to be completed before moving to the next step. For the GV1, the key activities are:

  • Assess systems, applications and infrastructure;
  • Program automated security tests, tool-assisted;
  • Safely explore critical vulnerabilities, checking it’s full potential;
  • Vendor and vulnerabilities newsletter analysis.

It is crucial that this process gets as automated as possible, since it requires the analysis of many applications and infrastructures. The recurrence is also something very important, as time goes by, new threats and vulnerabilities will be spotted in the wild, consequently new risks will appear.

Moving to the second step, GV2, the main activities are:

  • Develop and maintain a report standard;
  • Document and inform the findings;
  • Keep stakeholders aware of the known risks;
  • Expectation alignment, risk acceptance, remediation plans, etc.

It is important staying up to date with reporting the findings and making sure that the stakeholders involved are well aware of the risks and impacts that the vulnerabilities may present. It is also time to relate and compile all the information regarding the vulnerable asset, using asset inventory and vulnerabilities databases. It is possible to occur a callback for the GV1, it should happen whenever the findings could have changed, for example, when the stakeholders have taken some mitigation action and the vulnerability must be reevaluated.

For the GV3 step, the key tasks are:

  • Document, manage and monitor vulnerable assets;
  • Keep the risk acceptance or remediation plans in track and up to date;
  • Study and apply vulnerability remediation possibilities, firewalls, IPS, etc;
  • Focus efforts in mitigating critical vulnerabilities.

This step is supposed to organize the changes requests, incidents handling and risks management related to vulnerabilities, the idea is to maintain track of the risks and keep people aware in a timely manner. For example, if a given incident root cause is a previously found vulnerability, were the stakeholders aware of the issue and the impacts that it could lead to? Did they accepted the risk and maintained the vulnerability for a later study? Independently of the answer, it is important that the information security team does it’s job by safeguarding the company’s IT assets, informing the stakeholders that there are vulnerable assets and the risks are real.

For this first part, I’ve just shown a quick preview of this work and I’ll be digging in a more detailed post in part 2, talking about the GV1 process itself.

Source material:

  • SANS – Vulnerability Management: Tools, Challenges and Best Practices
  • SANS – Implementing a Vulnerability Management Process